By Bernie Clark, June 21st, 2019
Spinal nerves are mobile and dynamic. This is a good thing because as we flex, extend and twist the spine during our yoga practice, the spinal canal through which the spinal cord runs is constantly changing its length. While the spinal cord has some ability to stretch, it accommodates most of the spine’s length changes by sliding. The effects of this sliding are not fully understood, but clinicians have several theories on why it is beneficial. One idea is that mobilizing inhibited nerves improves nourishment. When the container through which the nerve runs is constricted, nutrients do not reach the nerve as easily. Mobilizing the nerve may improve blood flow to and from it, and may help to disperse any inflammation or inflammatory factors present.1 There is also speculation that nerves have an ability, through chemical or enzymatic means, to dissolve impinging tissues such as a bone spur, although exactly how this could occur has not yet been worked out. 2
Neurodynamics: Nerves should slide and glide
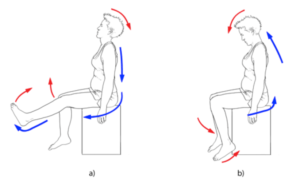
The main idea behind neuromobilization is to move the nerve by tugging at it from alternating ends. Figure 2 illustrates a way to do this sitting in a chair for a patient suffering from sciatica due to excess tension on the sciatic nerve, either through impingement of the nerve roots (perhaps due to a bulging disc) or from compression of the buttock muscles on the nerve (also called piriformis syndrome). When the head is dropped backward while the leg is extended with the foot dorsiflexed (a), the whole tract of the sciatic nerve and spinal cord is pulled downward, toward the foot. Reversing the direction (b), with the head dropped forward and the knee flexed and foot relaxed, pulls the nerves upward. This is meant to be a flow—not static positions and certainly not stretches. The flow should be slow (about five seconds in each direction), but the leg does not have to go to its ultimate range of movement. It is the movement that creates the sliding. Again, we are not trying to stretch the nerves; we are trying to mobilize them.
This “nerve flossing”3 should be guided by an experienced therapist in cases involving sciatica. If the sciatica is acute, this practice could aggravate the symptoms.
Healthy nerves glide and slide inside the surrounding tissues. When their ability to do so is impaired, tension may cause the nerves to become stretched. Healthy nerves can tolerate a certain degree of stretching, and to a point, this may be good for them. But too much stretching can impair function. It is wise to maintain our nerves’ ability to glide, and one way to do that is by regular flossing (just as your dentist recommended!) 4
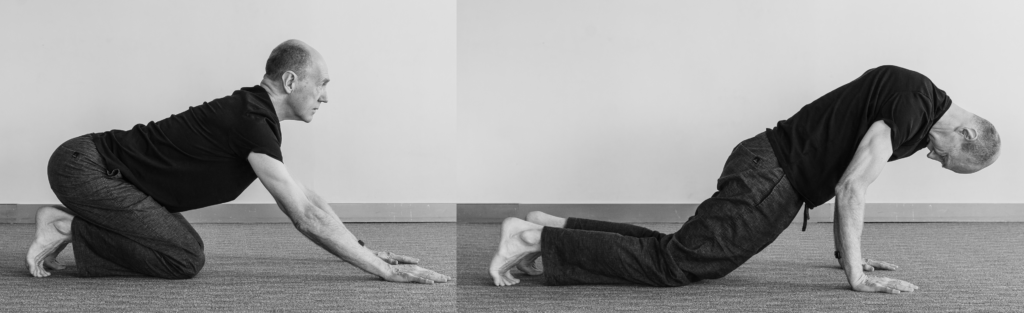
This can be done in your yoga practice, in a flowing variation of Cat-Cow (Marjaryasana/Bitilasana), as shown in figure 1 and 3. You can begin with a few regular Cat-Cow movements to loosen up the spine, but then we will add something a bit counterintuitive: the next time you inhale and look up, move your hips back (!) toward your heels. When you exhale and round your back up, dropping your chin to the chest, lean forward, straightening (extending) the hips. You may, as an option, lean even further forward so that your shoulders are ahead of your hands, as long as you keep the chin tucked and the back arched up.

The breath pattern with these movements may feel strange at first because we are not used to them; go slowly and deliberately to ensure you have the right coordination. Inhale/ look up/go back—exhale/look down/come forward. As you look up and move your hips back, the deep flexion at the hips will pull the spinal cord downward; as you look down and lean forward, the hips extend, releasing their downward pull, while the neck flexes, pulling the spinal cord upward.
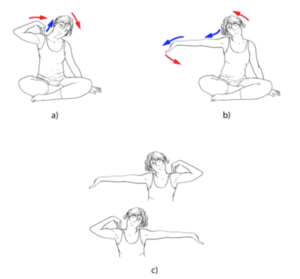
Nerve flossing is not limited to the spinal cord and nerves in the legs. Figure 4 shows how this can be done for the upper body as well. This may be useful for people experiencing repetitive stresses in the hands and wrists (such as carpal tunnel syndrome) or for people suffering from thoracic outlet syndrome where the brachial plexus may be inhibited in its movement. 5
Regular nerve flossing of the arm nerves may help to maintain the nerves’ mobility. The procedure for upper body nerve flossing is the same as for other areas: we release one end of the nerve tract while tugging at the other end. Figure 4a shows the head and neck laterally flexed away from the raised arm and hand, which in turn are flexed toward the head. In (b) we see the positions reversed, with the neck and head laterally flexed toward the raised hand, while the elbow, wrists and fingers are extended away from the head. Again, this flow should be repeated slowly (five-second cycles) up to 10 times for each side. It is possible, as shown in (c), to do both sides at the same time! This can be done while sitting or standing.
If you understand the principles behind neuromobilization, you can develop your own flows that achieve the intention. Perhaps you would prefer to do the standard chair nerve flossing while lying on your back or on your side. That could work! The spinal flossing in Cat-Cow is easily incorporated into a regular yoga practice.
If you are already experiencing nerve pain such as sciatica or carpal tunnel syndrome please see your health-care provider before trying out these movements. But if you have no such issues right now, these flows may help prevent nerve problems from arising in the future.
This article is excerpted from Your Spine, Your Yoga—Developing stability and mobility for your spine by Bernie Clark.
Footnotes:
- See Butler, The Sensitive Nervous System, 405.
- See McGill, Low Back Disorder, 3rd , chapter 10.
- I believe this term was coined by Stuart McGill; see Low Back Disorder, 2nd edition, 217–18
- This practice is also described in McGill, Low Back Disorder, 3rd , chapter 10.
- Moving the wrists from full extension to full flexion normally slides the median nerve 2 cm at the wrist. Indeed, simply wiggling your fingers can cause movement of 1 cm! Daily activities require about 3.5 cm of nerve sliding between the elbow and wrist. In fact, the bed of tissues within which the median nerve lies can lengthen by up to 10 cm from full wrist and elbow flexion to full wrist and elbow extension. To accommodate this lengthened pathway and to avoid a huge stretch, the nerve has to be able to slide. To be clear, some stretching does occur! The median nerve needs to move about 20% of its normal length to accommodate daily activities, and about 4% of this movement is accommodated by nerve stretching; the remaining 16% comes from gliding. See Butler, The Sensitive Nervous System, 117.