The McGill Big Three Exercises
Excerpted from Your Spine, Your Yoga
By Bernie Clark
December 15, 2023

Everyone knows that yoga, especially yin yoga, will develop and maintain spinal mobility, but according to Stuart McGill, a professor of spine biomechanics, more important than mobility is stability for the spine. First and foremost, the spine is a coupler between the upper and lower body and helps to transmit forces between these two regions. In order to do this effectively, the spine must be stable. Flexibility is a secondary concern.
ENHANCING STABILITY AND STRENGTH IN THE CORE
What are these best ways to strengthen the core while minimizing risk to the spine? Stuart offers several options that can easily be modified and worked into a yoga practice.1 These exercises can be practiced daily, which is beneficial for individuals recovering from low back pain. However, it is best to avoid spinal exercises first thing in the morning.2 In each case, these postures work with a neutral spine, maintaining the lordotic (inward) curve as much as possible and establishing an appropriate abdominal brace. (To create an abdominal brace, push some fingers into the side of your lower belly just above the pelvis, then try to push your belly out against the fingers. Not too much, just enough to feel some stiffening.3) While trying these poses, please be aware that more is not necessarily better. With too much effort you can start to lose the neutral lordotic curve in the lumbar and increase both compression and shear stresses.
1) Mini curl-up—enhancing rectus abdominis strength and endurance
Sit-ups and regular curl-ups (sometimes called “crunches”) have been shown to be counterproductive and create a lot of compressive force along the spine.4 An alternative and much safer exercise is a “mini curl-up” as shown in figure 1. The main emphasis for this pose is—less is more! Start with hands under the lumbar curve (not under the sacrum or pelvis); this will ensure that the lower back curve stays lordotic, preventing a flexion movement. One leg is straight on the floor, and the other leg is bent with the foot on the floor. Engage an abdominal brace to prevent any movement occurring in the lower back. The movement is subtle: lift the chest up an inch or two, but no higher. Keep your gaze at the ceiling to prevent flexing the neck. The head will lift up with the chest, but there is no need to draw the chin to the chest. The elbows may come off the floor as well; that is a bit more advanced and not necessary to start, but it does ensure the student is not pressing their upper body off the floor by using the arms and shoulders—this is meant to come from the core muscles. Immediately, you will begin to feel the stress in the rectus abdominis, which is the targeted area. The psoas, however, should remain quiet because there is no active hip flexion occurring. This guarantees that there is minimal compression along the spine.
Hold one cycle for about 10 seconds, take a brief rest, switch your legs, then repeat again for about 10 seconds: do this six times. After the sixth cycle, pause briefly, then repeat the whole process but do only four repetitions; again rest, then do a final set of two repetitions.5 Over time, you can increase the number of reps, but there is no need to increase the amount of time in each cycle. (See the section at the end of this article called “It’s Important: Building endurance.”) This pattern of decreasing repetitions within sets should be applied to the other postures described below.

2) Planks
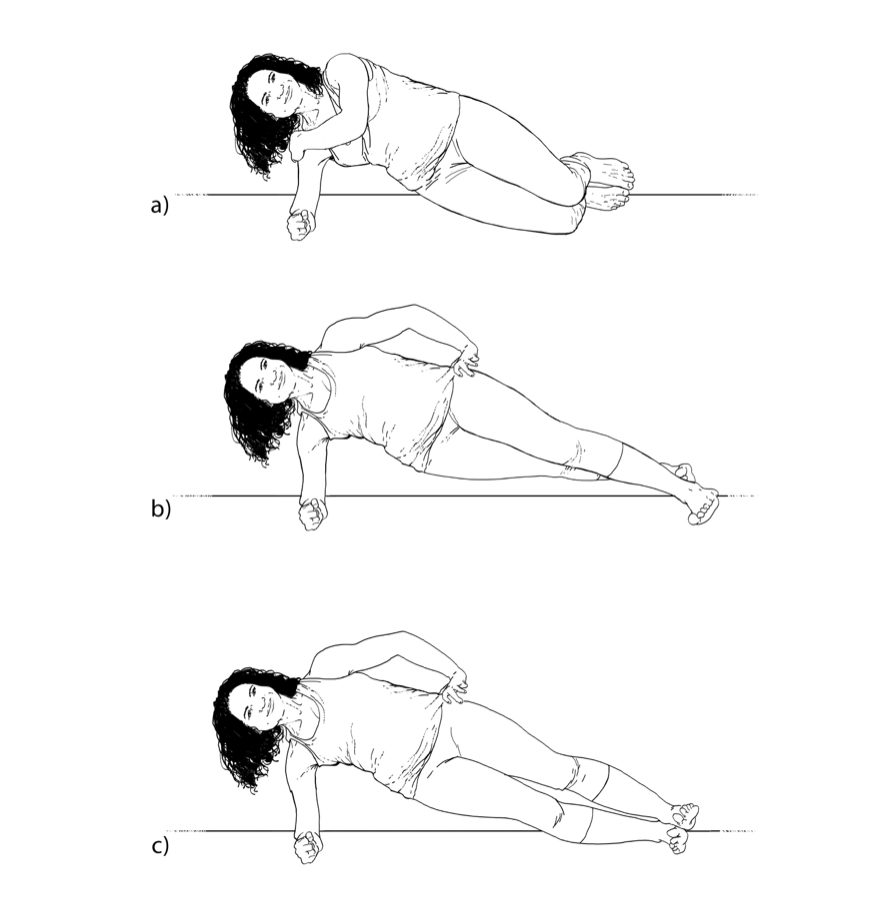
a) Side plank (Vasisthasana variations)—enhancing internal and external oblique strength and endurance
In the side plank (Vasisthasana) variations shown in figure 2, the internal and external obliques, the transverse and rectus abdominis, and the quadratus lumborum are all trained and toned, while the latissimus dorsi is integrated into the movement. When performed with an abdominal brace, the spine remains stable and neutral. Figure 2a is a good variation for beginners. The knees are bent 90° so there is less of a load on the torso. The legs are stacked on top of each other, and the bottom wrist and arm are stiffened to help support the shoulder. The free top hand can assist with shoulder stability by actively pulling down on the lower shoulder. Most importantly, the torso is braced and lifted forward (which naturally moves it up) so that the lumbar spine remains in a neutral lordotic position. Movement here is purely from the hip. If advisable, a more strenuous option is to let the top arm rest alongside the torso.
In figure 2b, the legs are straight with the feet no wider than the yoga mat and the top foot out in front of the back/bottom foot. Again, for more challenge, the top arm can rest alongside the torso. Figure 2c shows a more challenging and more traditional yoga side plank posture (albeit on the elbow instead of having the bottom arm straight), with the legs stacked on top of each other and the feet firmly dorsiflexed for support. Remember, the intention is to keep an abdominal brace and a neutral spine. In this posture, you can easily feel all the working core muscles, and yet because the spine remains neutral, this should be safe for most people. Another even more challenging variation for students who have no back problems is to raise the top leg off the bottom leg, but not too high (too high is easier muscularly but risks side-bending the spine).
For some people, the side plank is not available; those with shoulder issues will find the stress too great. For them, a standing side plank may work. They may do the same movements while leaning against a wall, with the feet back one to two feet so there is an angle between the torso and the wall.
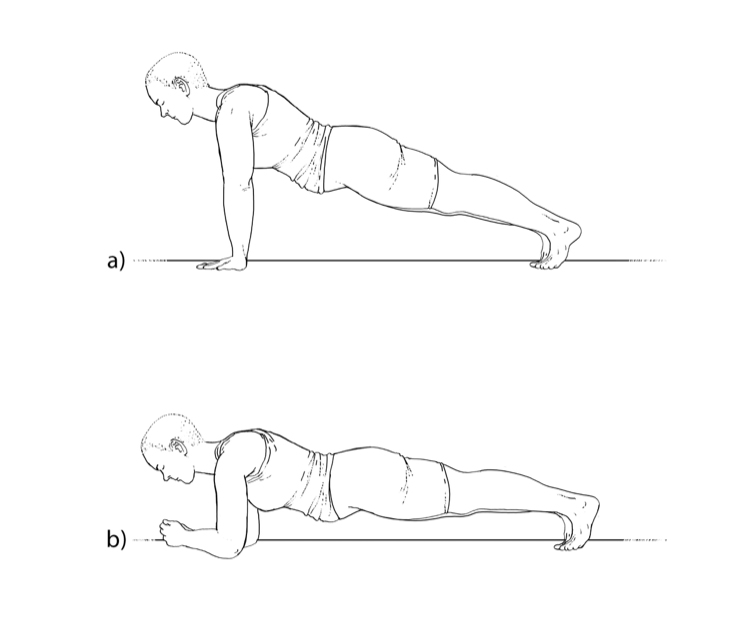
b) Push-up and plank on elbows (Dolphin Pose)—enhancing abdominal and back strength and endurance
Figure 3a shows a traditional plank pose on hands (the “upper push-up” position), while (b) shows the variation on elbows (a Dolphin Pose variation with a variety of names, such as Crocodile Pose). This posture is not for everybody, as it engages all the abdominal muscles, which form a hoop around our core, and can cause back pain in some students, but many students find this pose relieves their back pain.6 While holding a plank with arms straight, some of the body weight is taken by the feet due to the angled nature of the posture. As we move down to plank on elbows, more weight has to be borne by the core muscles, so holding a plank on elbows may be more challenging for our core but more sparing of the wrists. Some students may need to do a version of (b) where the knees are on the floor, which is okay as long as the hips stay at about the same height as the shoulders.
3) Balancing Cat (Birddog)—enhancing erector spinae strength and endurance
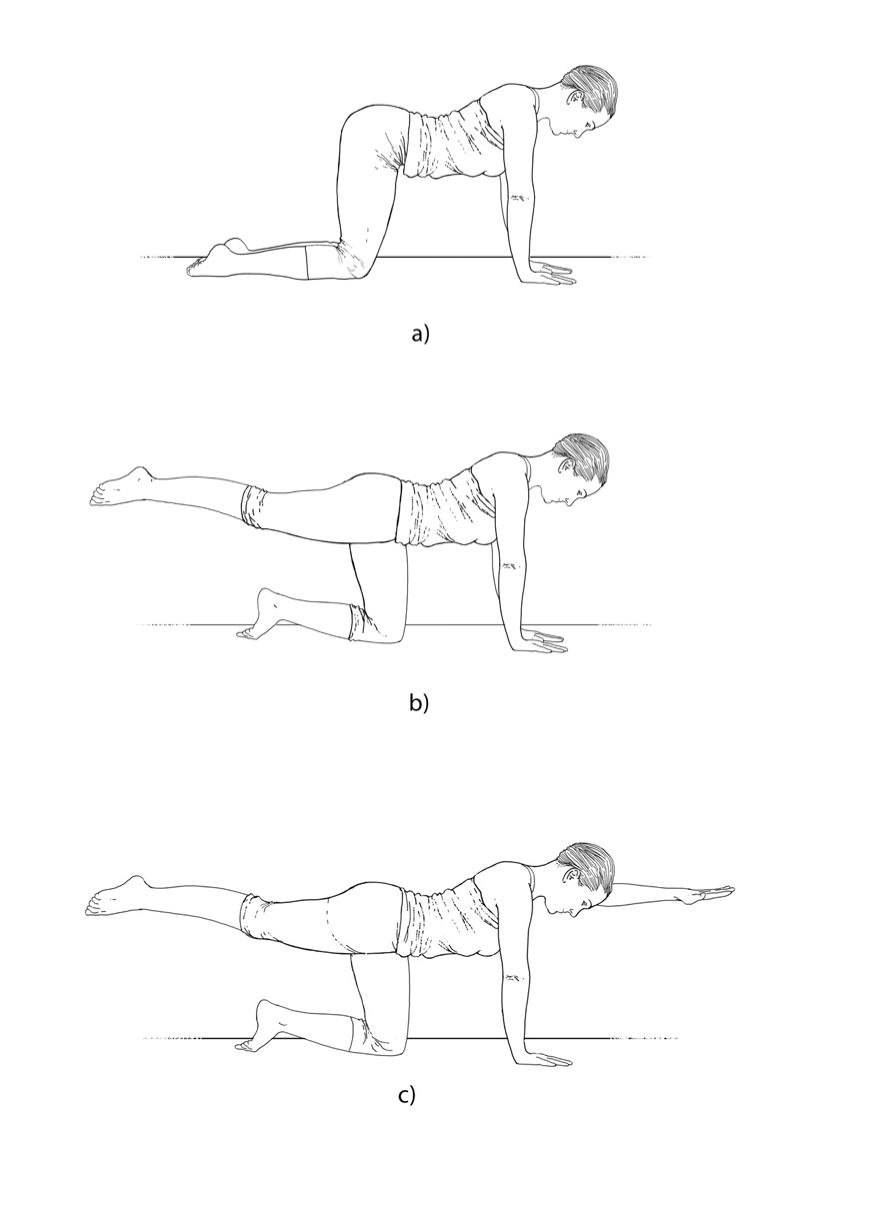
It can be challenging to stress the back extensors without overly compressing the spine. A Locust Pose (Salabhasana or the Superman Pose), can create huge compressive stress, but Balancing Cat (Marjaryasana—also called Birddog) can work the big back extensors without overly compressing the spine. The photo at the beginning of this article and figure 4 shows the Balancing Cat. The keys to safely doing its variations are to maintain an abdominal brace and keep the lumbar as neutral as possible. (If the wrists complain while doing the Cat Pose, you can substitute a more wrist friendly but paradoxically more challenging hand position. Come onto your fists, palms facing inward toward each other, pressing the first two knuckles firmly into the mat so that there is a straight line along the back of the hands up into the forearms. There is no need to bend at the wrist—keep it straight.)
Figure 4b shows the easiest variation of Balancing Cat: straighten one leg up and backward, again without changing the shape of the lower back. This option also activates only the extensor muscles on one side of the spine. With the variation shown in (c), the opposite arm is raised as well. Make sure neither the raised arm nor the leg goes higher than horizontal, because that will cause extension in the spine and you will lose the neutral shape. Make sure to keep the abdominal brace. In this variation, the lumbar extensors on the raised leg side and the thoracic extensors and latissimus dorsi on the raised arm side are activated and co-contracted.
You can increase the challenge to the upper back muscles by making a tight fist of the extended hand. To add an extra challenge to the glutes and hamstrings, keep the raised foot dorsiflexed (toes pointing forward, not backward), pushing out through the heel.7 This action should also prevent the tendency to lift up that leg’s hip.
IT’S IMPORTANT: Building endurance
While strength is prized for obvious reasons, there is little to no correlation between the strength of our back muscles and low back problems. However, there is an inverse relationship between flexibility and back problems, with more flexible spines being more likely to have problems than less flexible ones. But the strongest positive correlation is between the endurance of the back muscles and the health of our spine.8 This understanding leads to an important training philosophy: when rehabilitating an injured spine, or optimizing the health of a normal spine, focus on building the endurance of the back muscles first and foremost.9
Building endurance requires not greater loads and longer stresses, but more repetitions. Once endurance is satisfactory, then work on lengthening the time you hold the posture, followed later by increasing the size of the load. Start with a few reps and see how your body reacts; if it feels good, add more reps over time, for as long as you see improvement. For example, in the Balancing Cat posture, start with six reps of 10-second holds on each side.10 Take a 30-second break (Child’s Pose—Balasana is nice) and do another set but with four repetitions of holds per side; then for the final cycle do two reps on each side. In time, if you feel you need more challenge, don’t hold longer but do more reps: add one rep per set—to seven, five, three.
As we repeat a movement, our bodies tire, and this can affect our technique. It is better to reduce the times in each cycle of an exercise so that we can maintain technique, which helps to prevents injuries.11
______________________
[1] These are often referred to as Stuart McGill’s “Big 3” exercises. For more information about McGill’s teaching and training, including his articles, interviews, books and videos, visit his website at www.backfitpro.com.
[2] The reason is – the spine elongates overnight and creep sets in, making the ligaments a little bit longer and weaker. It can take up to 30 minutes or more for the ligaments to return to their normal elasticity.
[3] To learn more about bracing and space, see the article 3 Things I learned from a Weekend with Spine Biomechanic, Stuart McGill.
[4] See McGill, Low Back Disorders, 2nd ed., 88.
[5] See McGill, Back Mechanic, 118.
[6] See McGill, Low Back Disorders, 2nd ed., 90.
[7] Interestingly, dorsiflexion of the ankle can help reduce chronic low back pain! See Rebecca Gordon and Saul Bloxham, “A Systematic Review of the Effects of Exercise and Physical Activity on Non-Specific Chronic Low Back Pain,” Healthcare 4.2 (2016): 22, doi:10.3390/healthcare4020022.
[8] See McGill, Ultimate Back Fitness and Performance, 47.
[9] Back problems are more likely to arise in people who have higher endurance in their flexor muscles (the abdominals) than in their extensors (erector spinae), so focus on building the endurance of your back muscles more than that of the abdominal muscles.
[10] According to Stuart McGill, limiting the holds to 10 seconds will help to minimize the risk of muscle cramps and restore the oxygen/acid balance; see McGill, Back Mechanic, 103.
[11] See McGill, Ultimate Back Fitness and Performance, 229–32.